Wednesday 23 December 2015

Christmas Card Series 2015 - Card #9

Hi!
Welcome to Day 9 as well as the last day of my Christmas Card Series for this year. Due to my poor planning, I wasn't able to make 12 Christmas cards in time this year. I will try to do better next year!

So here's the last card for this year and I used the stamps which I bought during my trip to Japan. It is so stinking cute!


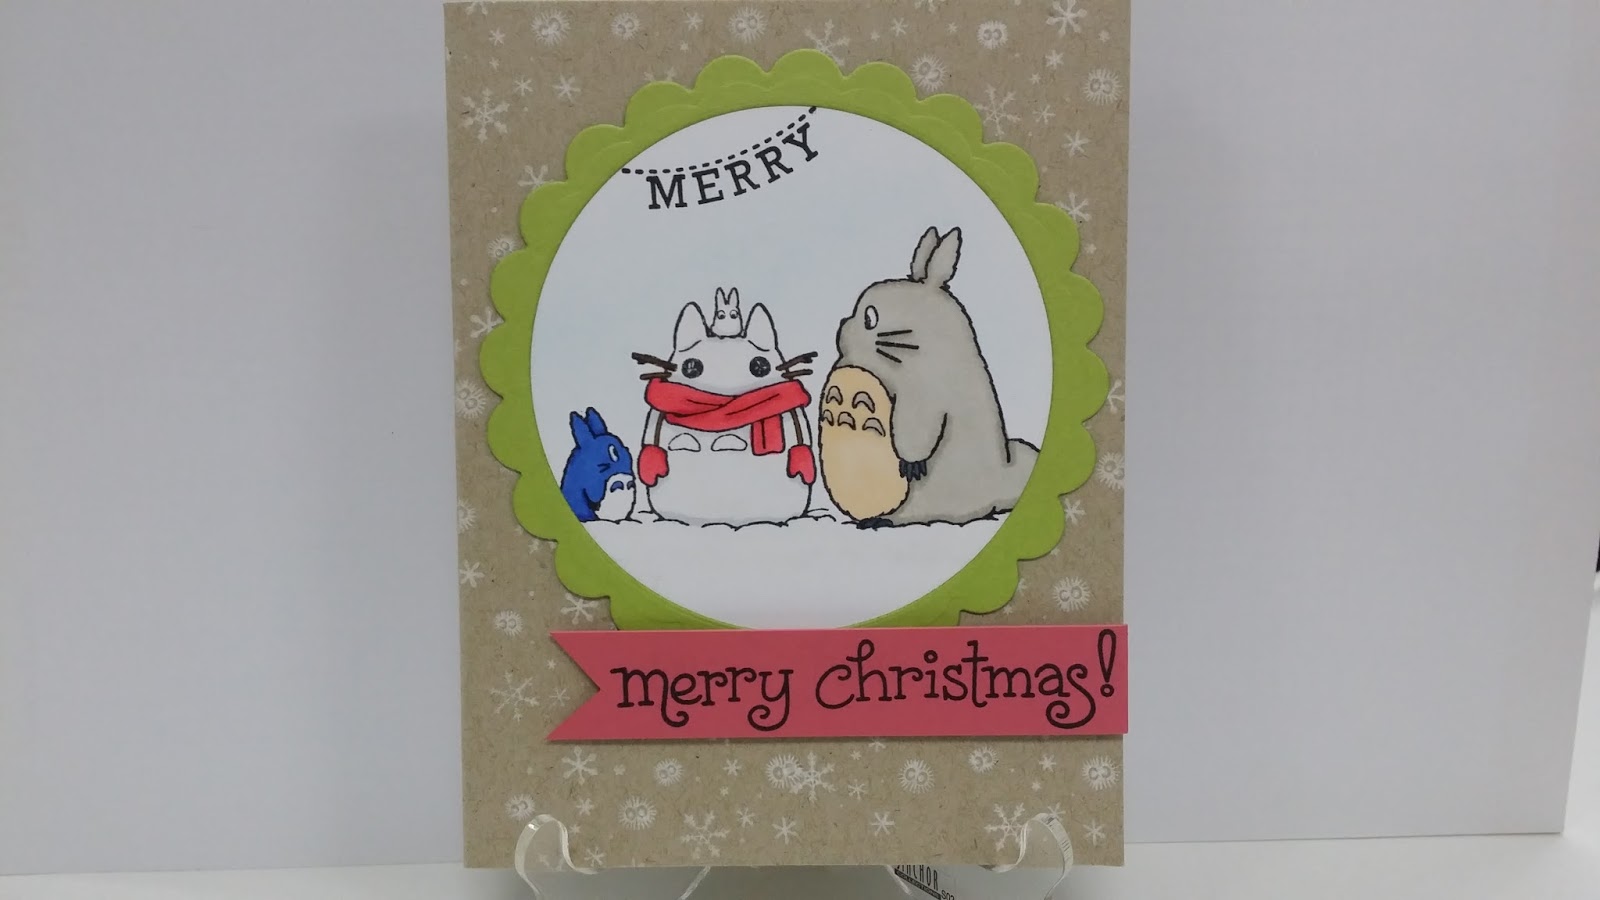
I made the card base using Neenah Solar White cardstock, scored and folded in half. I then stamped the snowflakes in Hero Arts Unicorn White pigment ink all over the card front. If you look closely, you will be able to see the adorable soot sprites (that's the reason I bought this little stamp) from Studio Ghibli's My Neighbor Totoro and Spirited Away among the snowflakes.


I stamped the Totoro image onto Neenah Solar White cardstock in Memento Tuxedo Black ink and colored them in with Copics. I then die cut the image using My Favorite Things Circle Stax One dies and adhered it onto the Simon Says Stamp Green Apple piece which I have die cut from Lawn Fawn Scalloped Circle Stackable dies set.

I adhered the scalloped circle to the card front using some glue tape. I then stamped the "Merry" sentiment from Mama Elephant Polar Pals stamps set onto the Totoro image because I feel it is too bare up top. Lastly, I popped the sentiment which I stamped from Lawn Fawn Joy to the Woods stamps set on some foam tape before adhering it under the image.

That's all for the update today.
Thanks for stopping by and I wish everyone "Merry Christmas and Happy New Year!!!". I will see you again next year!

Tuesday 22 December 2015

Christmas Card Series 2015 - Card #8

Hi!
Welcome to Day 8 of my Christmas Card Series. 

Today's card is quite simple. I made the card base using Neenah Solar White cardstock, scored and folded in half. I die cut a circle from the card base using Simon Says Stamp Stitched Circles dies set and trimmed off 1" from the bottom part of the card front.


I cut a piece of 5 1/2" x 4 1/4" Neenah Solar White cardstock and adhered some pattern paper onto it. The pattern papers are from Lawn Fawn Snow Days paper pack. I adhered the piece with pattern papers behind the card front. I stamped the penguin images in Memento Tuxedo Black and colored them in with Copics before die cutting them out using the coordinating dies. The images and sentiments are from Mama Elephant Polar Pals stamps set.


I finished the card by tying some jute string around the card front and added some Wink of Stella Clear Glitter to the stars.

That's all for the update today.
Thanks for stopping by and drop by again tomorrow for Card #9.

Monday 21 December 2015

Christmas Card Series 2015 - Card #7

Hi!
Welcome to Day 7 of my Christmas Card Series. Sorry that this post is only up today instead of yesterday because I was too tired.

Today's card is a round card base. I made it using 2 pieces of Neenah Desert Storm cardstock which I die cut using My Favorite Things Circle Stax One die. I scored 1/2" at the top of 1 of the circle piece and put adhesive on the 1/2" panel. I adhered the other circle piece on top and this completes the circle card base.


I stamped the Christmas tree from Mama Elephant Cozy Christmas stamps set in Hero Arts Unicorn White pigment ink and colored the tree using color pencils. I stamped Mr & Mrs Santa from the same stamps set in Memento Tuxedo Black ink and colored them in with Copics before die cutting them with the coordinating dies.


I adhered Mr & Mrs Santa to the card base using some glue tape. I also stamped, colored and die cut the gloves, present and cup of hot cocoa. I adhered those pieces using glue tape and foam tape for dimension. I finished the card by stamping the sentiment from Lawn Fawn Joy to the Woods stamps set in Hero Arts Unicorn White pigment ink. I went over the sentiment and the Christmas tree with a Uniball Signo White gel pen because I felt that the white ink is too dull. I also added some faux stitch line around the card with the same gel pen.

That's all for the update today.
Thanks for stopping by and drop by again tomorrow for Card #8.

Saturday 19 December 2015

Christmas Card Series 2015 - Card #6

Hi!
Welcome to Day 6 of my Christmas Card Series. Today's card is a white on white card with just a touch of colour.


The layers are follows:
  1. Card base: 4 1/4" x 11" Neenah Solar White, scored and folded in half
  2. Background piece: 3 3/4" x 5" Neenah Solar White, I used Wendy Vecchi embossing paste and Simon Says Stamp Falling Snow stencil to create the background. I added some Wink of Stella Clear Glitter onto the falling snow once the paste is dried.
  3. Sentiment piece: Die cut from Lawn Fawn Large Stitched Rectangle die set (second largest, if I'm not mistaken). I stamped the medallion images from Stampin' Up Daydream Medallions stamps set in Stampin' Up Soft Sky, Bermuda Bay, Simon Says Stamp Fog and Smoke ink. The sentiment is from Stampin' Up Delightful Dozen stamps set in Versafine Black Onyx ink.
Card Assembly:
I tied a bow using some white sheer ribbon around the background piece before adhering it to the card base using glue tape. I popped the sentiment piece up on a piece of foam sheet that is slightly smaller then the sentiment piece and adhered it onto the background piece. Lastly, I finished the card by adding a big, clear rhinestone in the center of the medallion image.


That's all for the update today.
Thanks for stopping by and drop by again tomorrow for Card #7.

Friday 18 December 2015

Christmas Card Series 2015 - Card #5

Hi!
Welcome Day 5 of my Christmas Card Series.

Today I CASED another card from a pin on Pinterest. I like the colour combination and the simplicity of it.

Here's the card on Pinterest:


And here's my version of it:


I used Neenah Desert Storm cardstock for the card base and Neenah Solar White cardstock for the card front. I trimmed the Solar White piece at 3 3/4" x 5 1/2" so that it will show a 1/4" border of the card base on each side.

I die cut the snowflakes using Simon Says Stamp Melody Snowflake die and popped the Solar White panel using some foam tape. Before I adhere the panel to the card base, I cut some cardstock pieces from Simon Says Stamp Sunshine, Green Apple and Stampin' Up Strawberry Slush to layer behind the negative space of the snowflakes.

I stamped the sentiment from Simon Says Stamp Peace On Earth stamps set onto some Simon Says Stamp Sea Glass cardstock and die cut it using Lawn Fawn Small Stitched Rectangle die set. I finished the card by adhering a bow on top of the sentiment piece.


That's all for the update today.
Thanks for stopping by and drop by again tomorrow for Card #6.

Thursday 17 December 2015

Christmas Card Series 2015 - Card #4

Hi!
Welcome to Day 4 of my Christmas Card Series.

I saw a card on Pinterest and I really liked how the trees looked suspended on the card front so I decided to CASED the card.

Here's the card I saw on Pinterest:


And here's my version of it:


I first started with a piece of 8 1/2" x 5 1/2" Simon Says Stamp Schoolhouse Red cardstock, scored and folded it in half. I then cut out 2 1/4" x 5 1/2" from the center of the card front. This will leave a 1" x 5 1/2" tab on the card front and a loose strip of 1" x 5 1/2" cardstock. I cut 2 strips of 3/4" x 5 1/4" from some pattern paper and adhered them to the top and bottom. 

I stamped the medallion image twice, offsetting the image during the second stamping to create a wreath image. The medallion image is from Stampin' Up Daydream Medallions stamps set. The ink colours used for the image are Simon Says Stamp Green Leaf and Versafine Spanish Moss. I die cut the image using the coordinating die from Stampin' Up and a circle from the center of the image using My Favorite Things Circle Stax One. I made 2 sets of this wreath die cut.

I then die cut a circle slightly bigger than the circle of my wreath piece from a piece of acetate. I then adhered the wreath pieces together, sandwiching the acetate piece in between onto the card front. I die cut the word die twice from some pattern paper from Lawn Fawn Scripty Joy die. I adhered the word onto the front side of the acetate and the other piece behind to cover up the adhesive.


I finished the card by tying a small bow using red satin ribbon and adhering it to the top of the wreath, some red rhinestones all around the wreath and a piece of Neenah Solar White cardstock inside the card for message.

That's all the update for today.
Thanks for stopping by and drop by again tomorrow for Card #5.

Wednesday 16 December 2015

Christmas Card Series 2015 - Card #3

Hi!
Welcome to Day 3 of my Christmas Card Series. This post is supposed to be up last Wednesday but due to some problems with the internet connection, it has been delayed.

So here's card #3:


I first cut a piece of 8 1/2" x 5 1/2" Simon Says Stamp Schoolhouse Red Cardstock, scored and folded it in half for my card base. I then trimmed the edge of the card at an angle. I cut 2 strips of cardstock using Simon Says Stamp Green Apple and Neenah Desert Storm.

I die cut different pattern papers using Simon Says Stamp Brilliant Gifts die, mixed and matched the pieces together to create this colourful row of presents. I stamped the sentiment from Lawn Fawn Joy to the Woods stamps set using some metallic gold ink.

I drew some faux stitched lines around the red portion with a Uni-ball Signo Gold Pen and finished the card off with 3 clear rhinestones at the bottom left corner.


That's all the update for today.
Thanks for stopping by and drop by again tomorrow for Card #4.